
This do-it-yourself cinnamon swirl bread recipe is a household favourite and requires solely a handful of primary elements (simply 8!). It’s smooth and tender with essentially the most unbelievably gooey cinnamon swirl inside. Every yeasted bread slice tastes fabulous by itself, however attempt it toasted with some butter… unbelievable! For a no-yeast model, see my cinnamon swirl fast bread.
One reader, Michelle, commented: “Probably the greatest recipes for cinnamon swirl on the market. The bread is fluffy such as you would discover in a bakery and it has simply the correct amount of cinnamon and sugar, with out being too gooey. We made our first loaf final evening and by morning it was gone, so we’ve got to make a second loaf. ★★★★★“
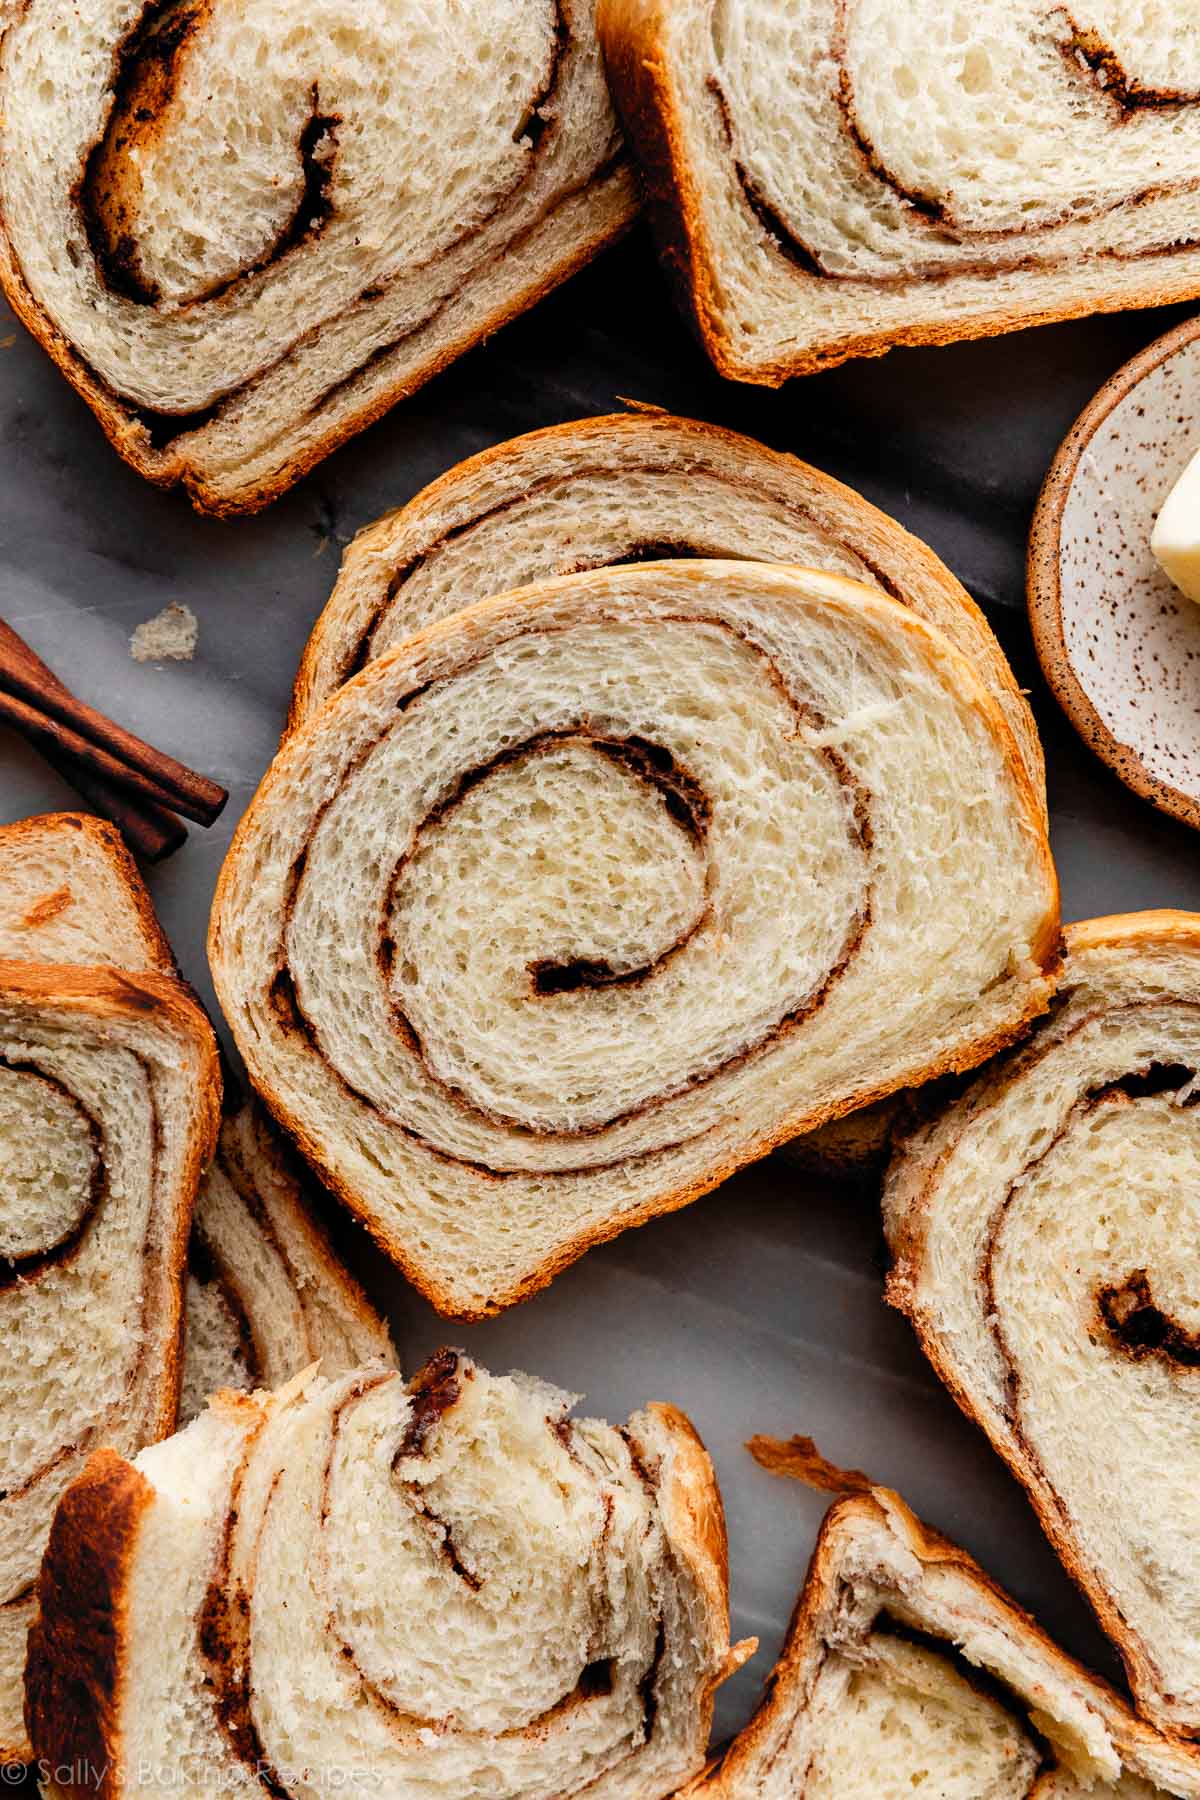
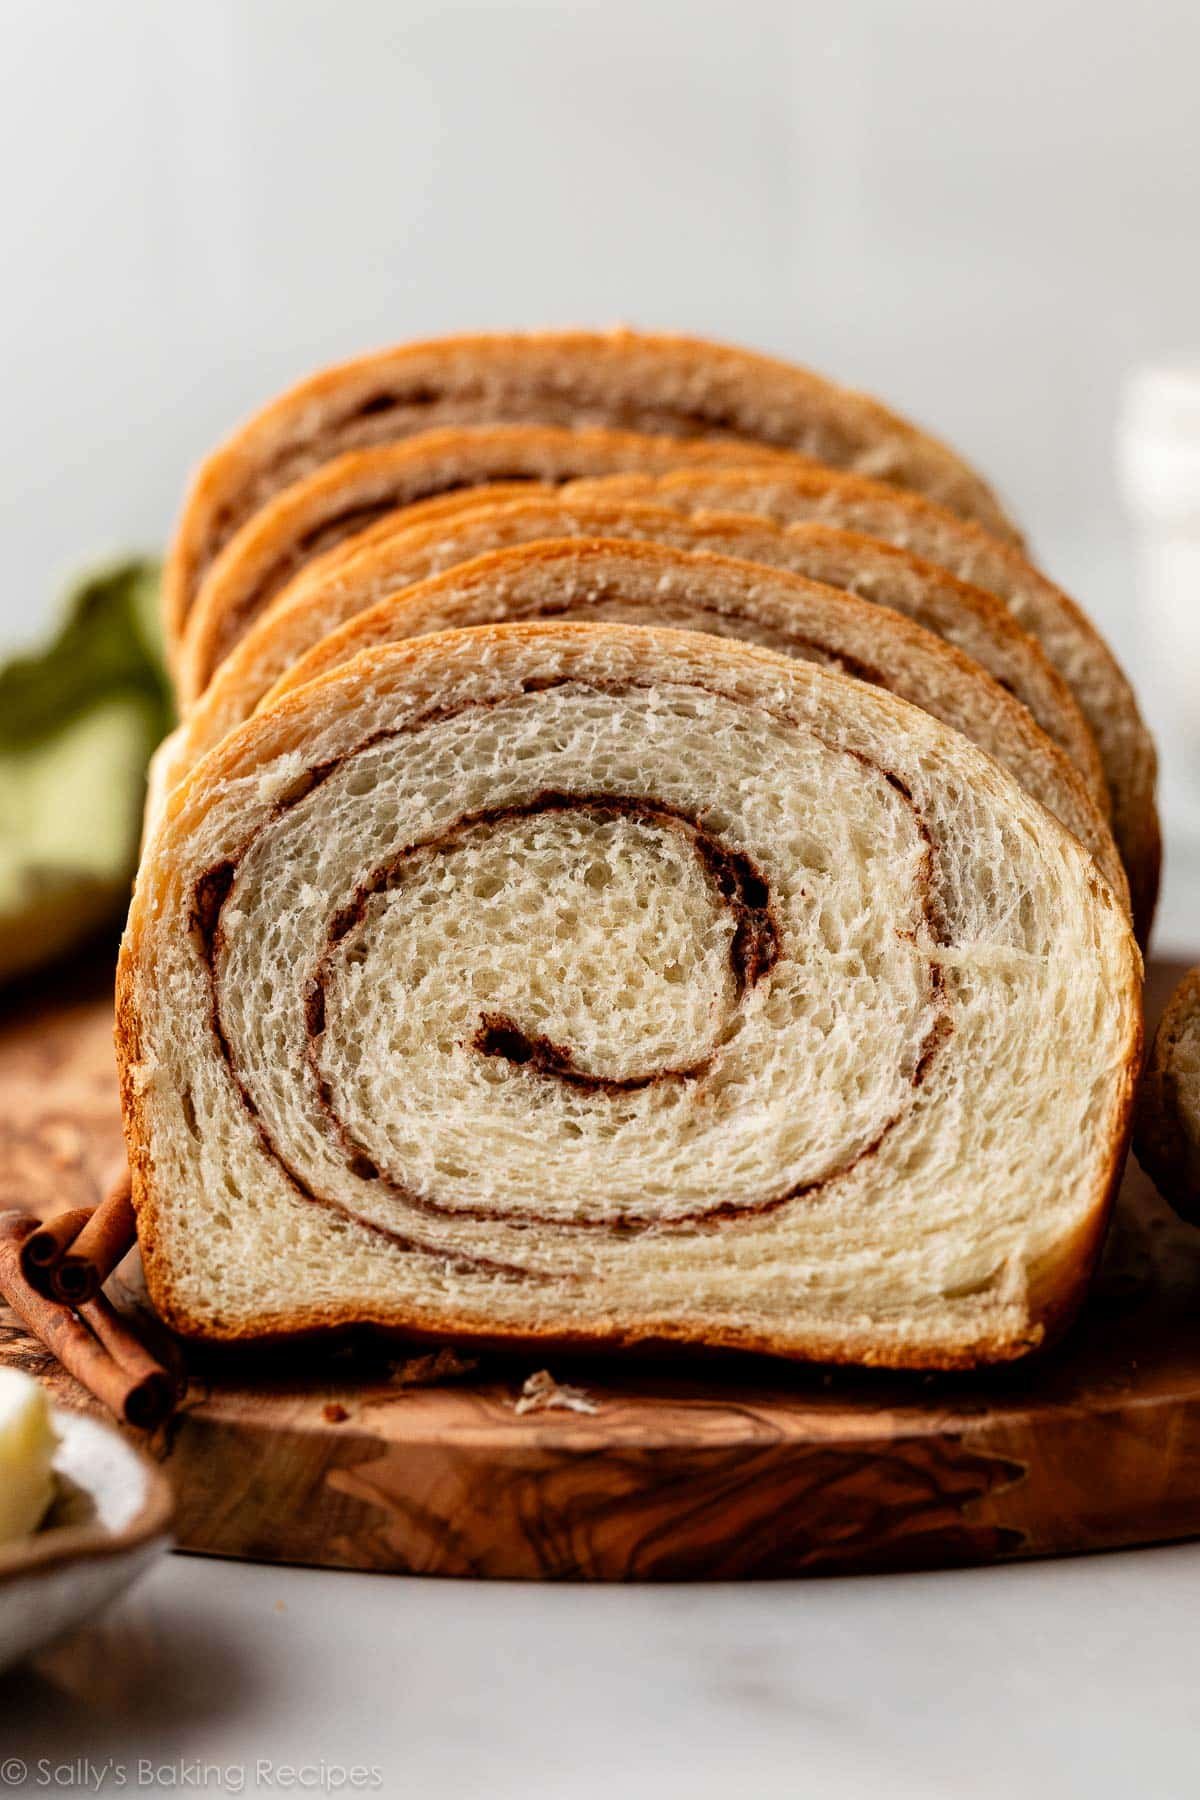
Home made cinnamon swirl bread is one in every of life’s biggest treasures. Sizzling & contemporary out of the oven, the scent alone will captivate a big crowd. The bread is buttery smooth and the hypnotizing swirls are deliciously candy. This recipe is mainly a simplified model of my cinnamon crunch bread.
You already know I really like an excellent cinnamon sugar swirl (I imply, have you ever tried this cinnamon swirl banana bread??) However truthfully, there’s nothing on earth fairly just like the craft of do-it-yourself yeast bread. Isn’t it so satisfying? That’s why I’ve so many do-it-yourself yeast bread recipes on this web site. Everybody’s favourite!
Baking with Yeast Information
Are you a yeasted bread newbie? Reference this Baking with Yeast Information everytime you work with baker’s yeast. I embrace sensible solutions to all your frequent yeast questions.
Up to date & Improved Cinnamon Swirl Bread Recipe
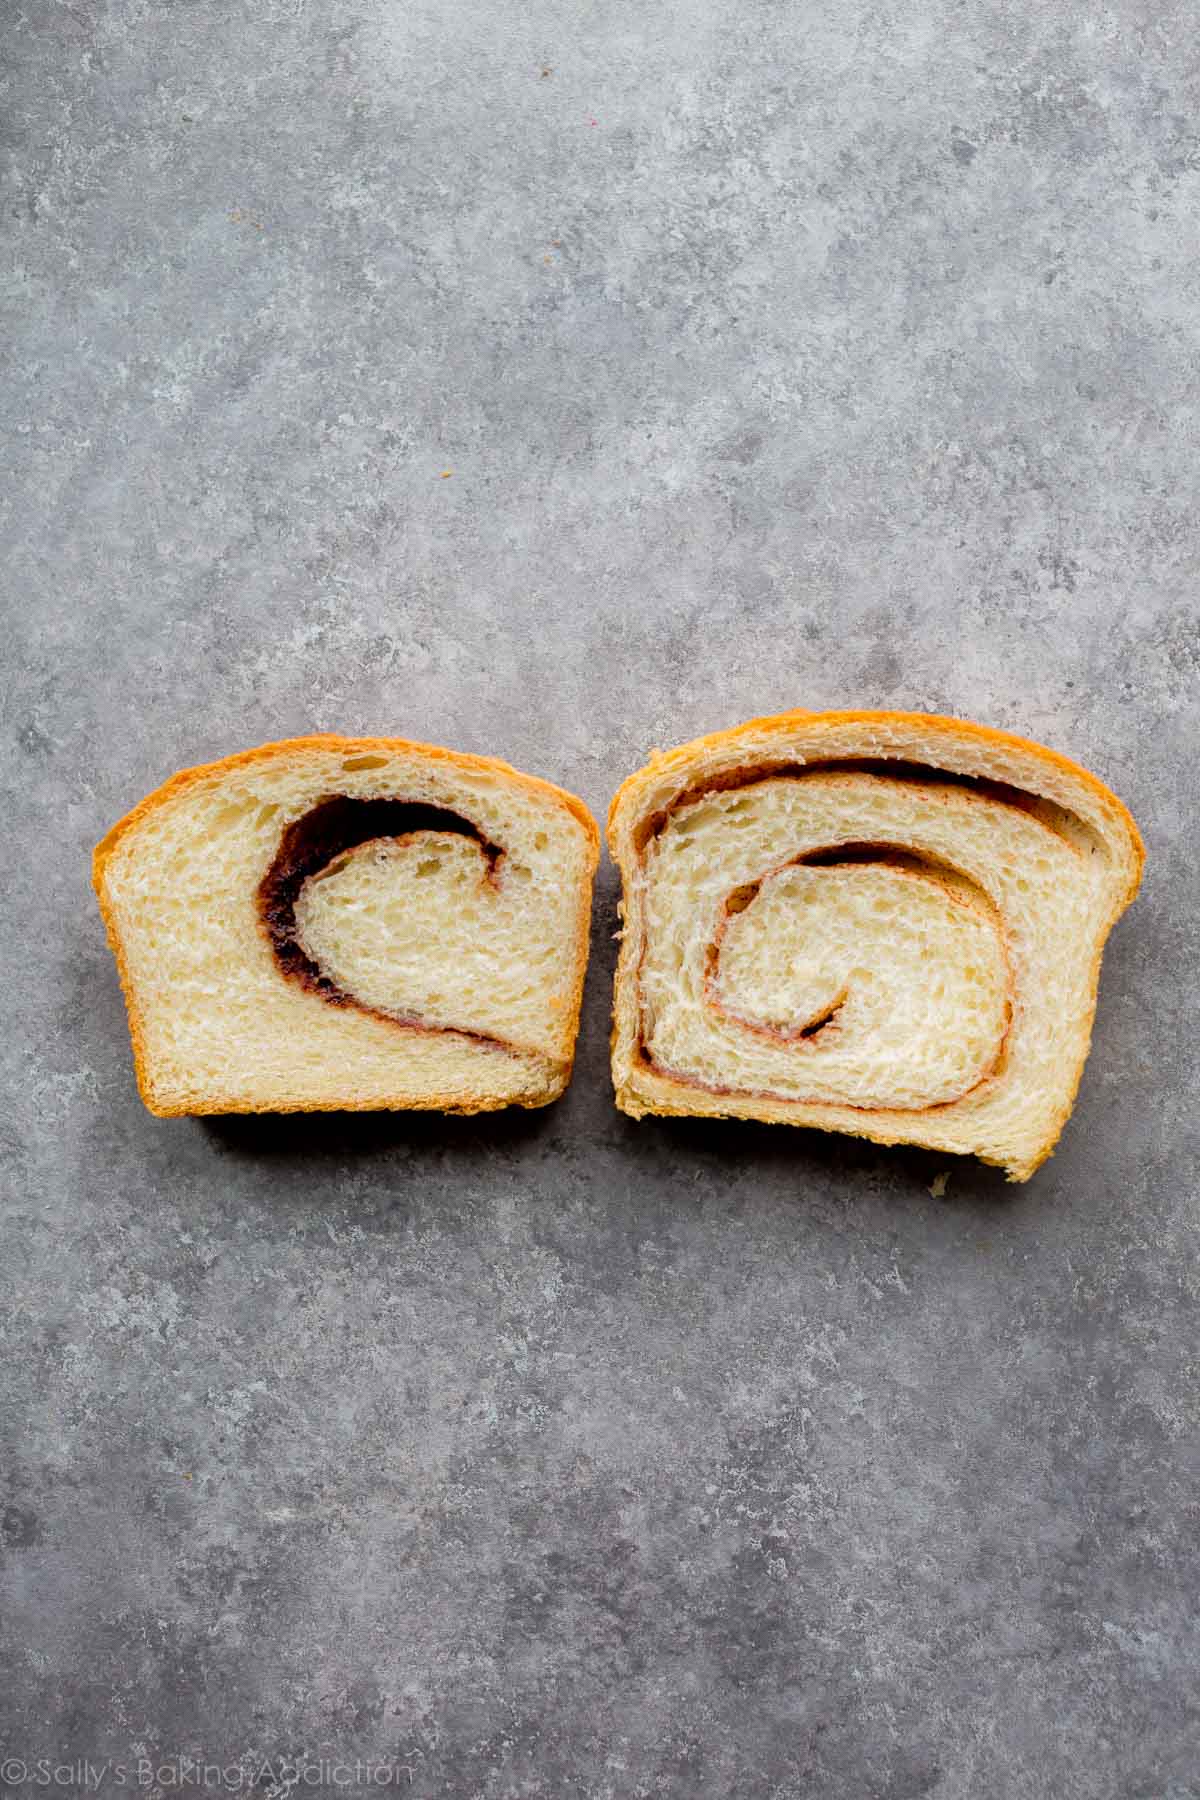
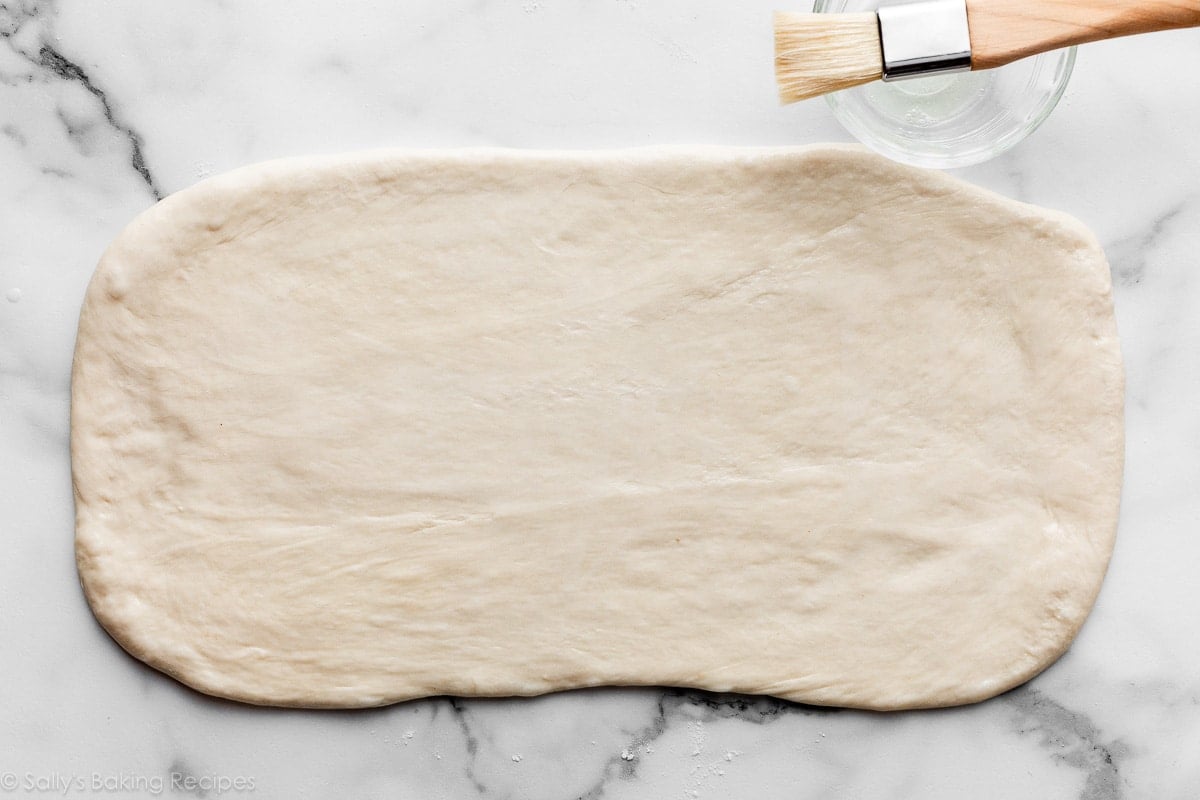
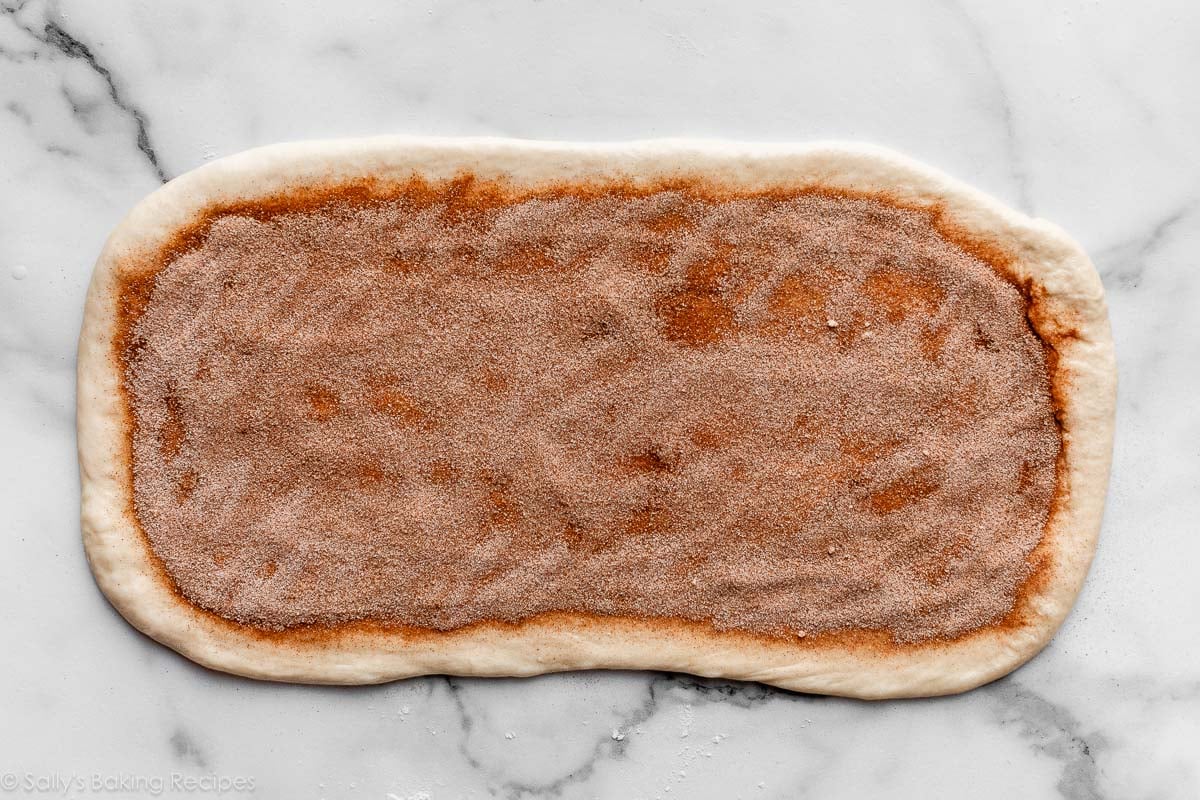
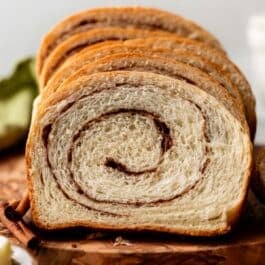
This recipe has seen some updates over the previous decade, and I wish to present a fast comparability picture. Once I first printed this recipe, I formed the dough right into a thick sq. and rolled it up. This gave me little or no swirl contained in the baked bread. Now I roll it out right into a thinner 8×20-inch rectangle. I brush the rolled-out dough with egg white, and sprinkle the cinnamon sugar on prime. The egg white helps the cinnamon sugar stick, and helps forestall massive air gaps within the baked bread.
This methodology produces extra swirls in every slice. The loaf additionally rises taller because it bakes. I nonetheless can’t imagine the BIG distinction these SMALL adjustments make. Have a look at the slices:
Find out how to Make Yeasted Cinnamon Swirl Bread
At the moment I’m educating you the best way to grow to be a bread-baking skilled (effectively, near it!). This recipe is similar to my sandwich bread recipe, nevertheless it’s somewhat sweeter. Observe my suggestions and shortly you’ll bake do-it-yourself croissants or croissant bread, do-it-yourself bagels, cheese bread, and even star bread. With solely a handful of primary elements, your kitchen will rework right into a bread bakery!
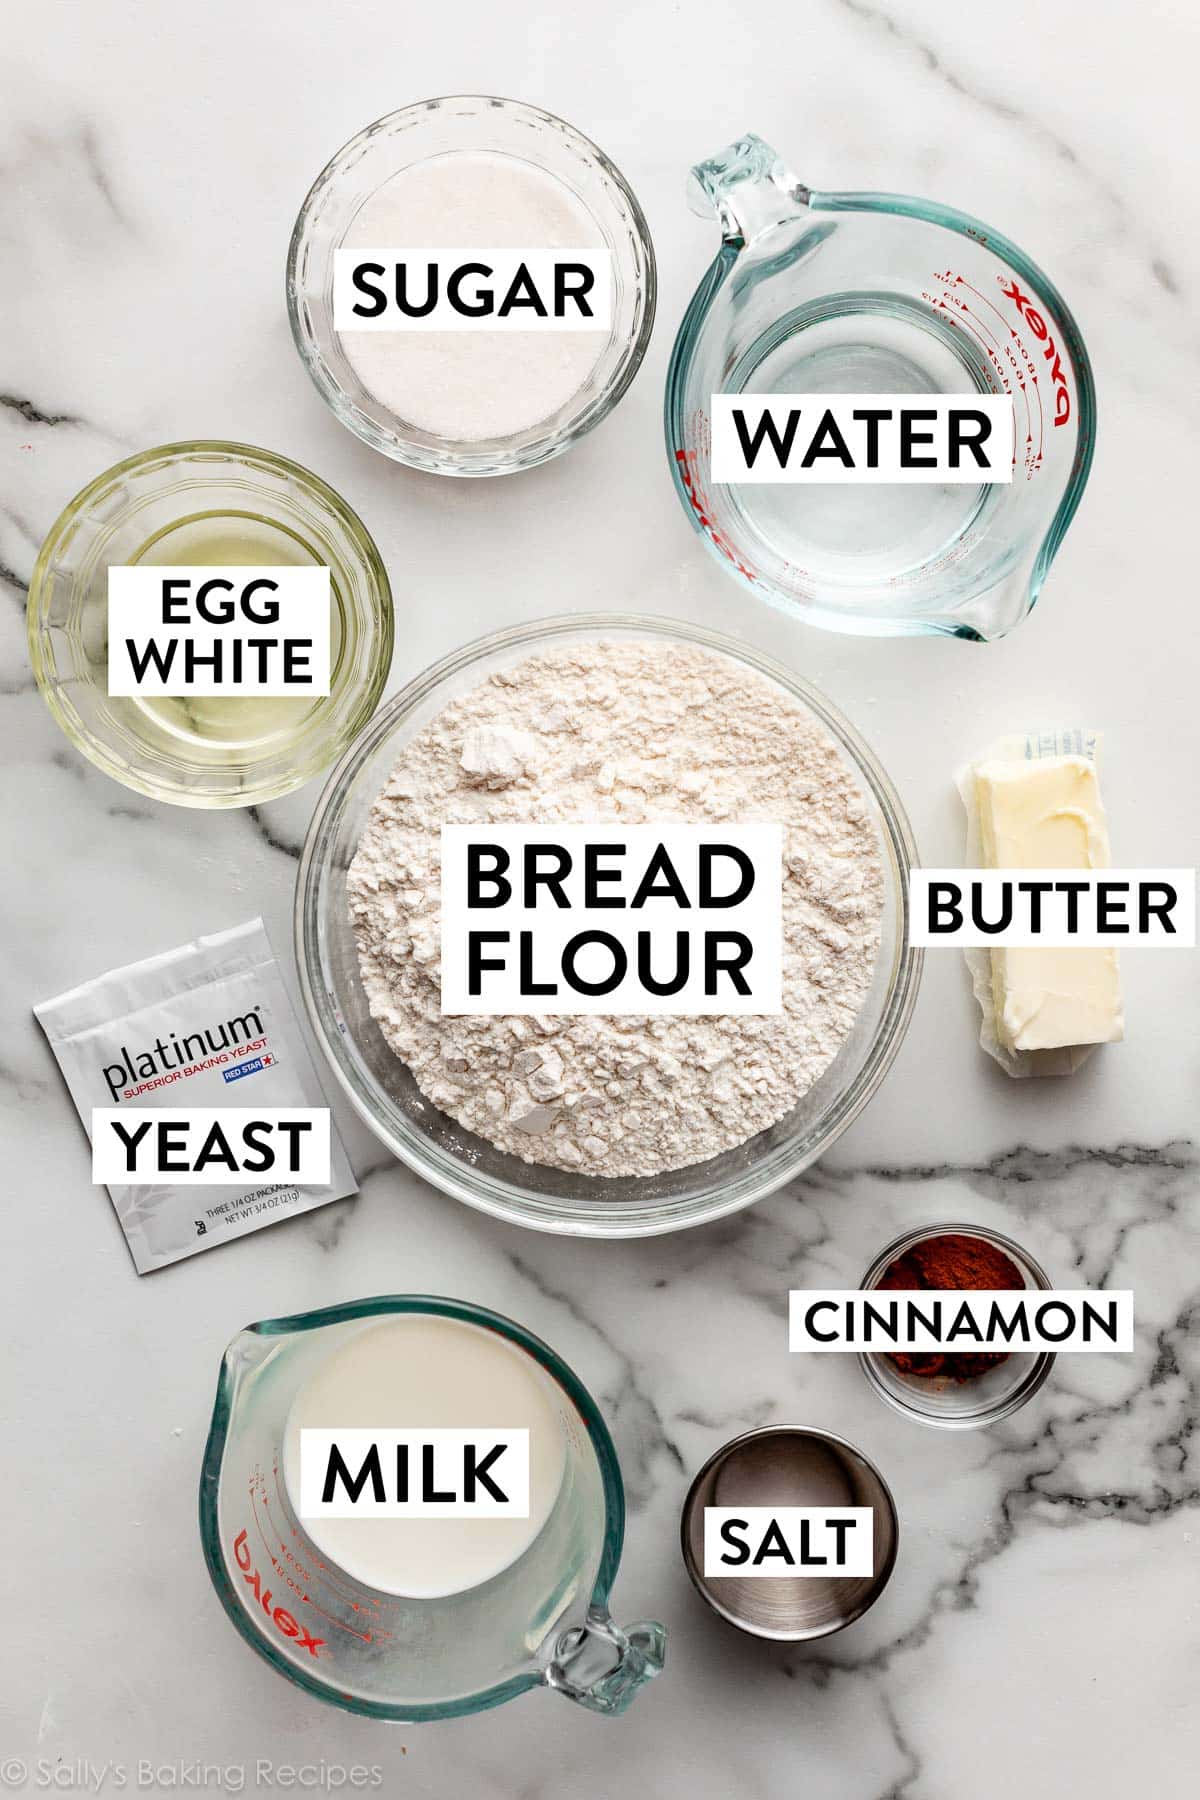
- Put together the Dough: Step one is to combine the bread dough. You want yeast, sugar, water, milk, butter, bread flour, and salt. The factor about do-it-yourself bread is that the elements are SO primary, however throw the phrase “yeast” in there and plenty of really feel intimidated. I promise it’s not troublesome to throw this dough collectively. So long as you give the yeast, sugar, water, and milk a couple of minutes to take a seat earlier than including the opposite elements, you’re heading in the right direction!
- Use Bread Flour: All-purpose flour doesn’t have sufficient energy to help the rise and construction of cinnamon swirl bread. Bread flour is offered proper subsequent to the all-purpose flour within the baking aisle, and in case you want some recipe inspiration in your leftover bread flour, attempt any of those recipes.
- Knead the Dough: Have you learnt how to do that? If not, I’ve a whole tutorial and video for Find out how to Knead Dough.
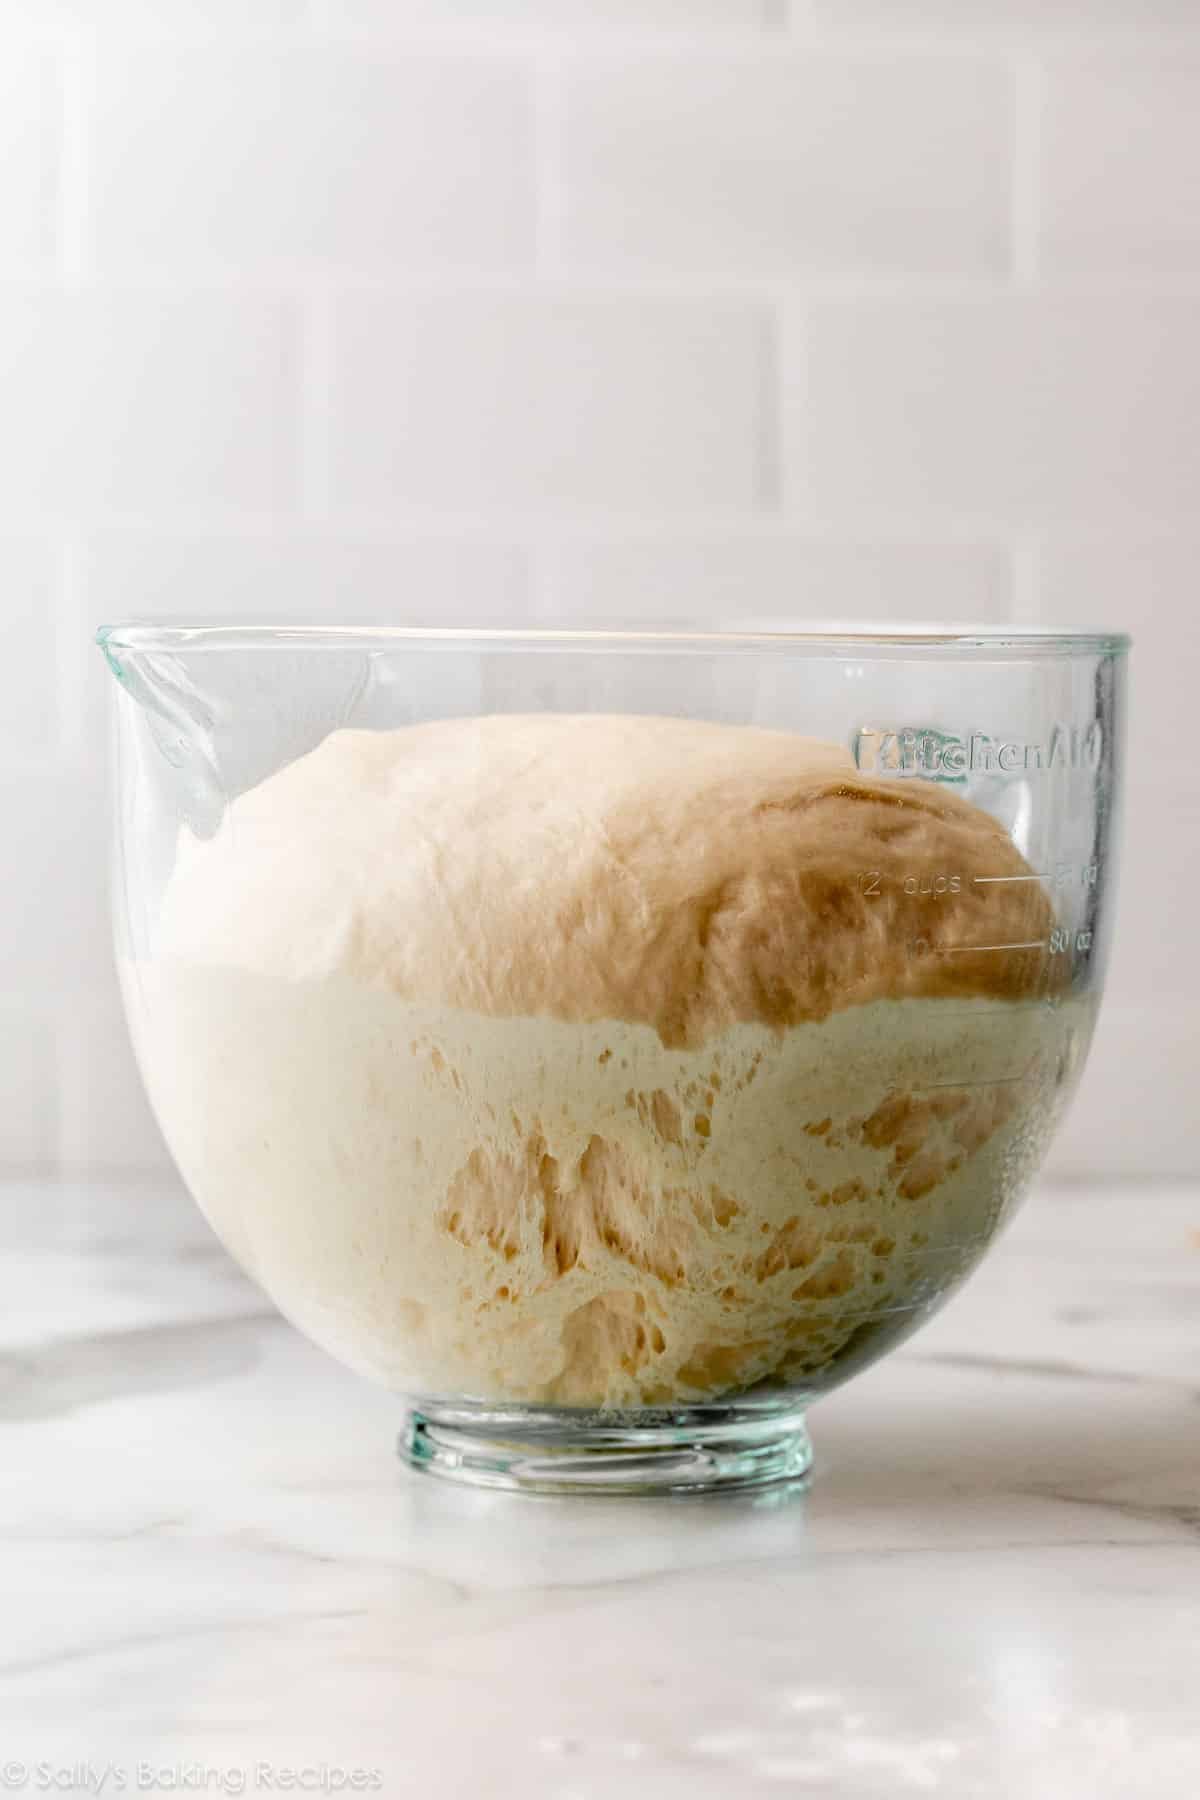
- First Rise: The dough should rise twice. After you knead the dough, let it rise till doubled in dimension.
- Swirl the Dough: After the dough rises, punch it down, then roll it out. Brush with egg white, sprinkle with cinnamon and sugar, and roll again up.
- Second Rise: Place the rolled dough right into a loaf pan and let it rise for 1 extra hour.
- Bake: Pat your self on the again as a result of—congratulations!—you’re a bread baker with the best but tastiest do-it-yourself cinnamon bread recipe on the planet.
These Step-by-Step Photographs Will Assist:
These are the elements you want:
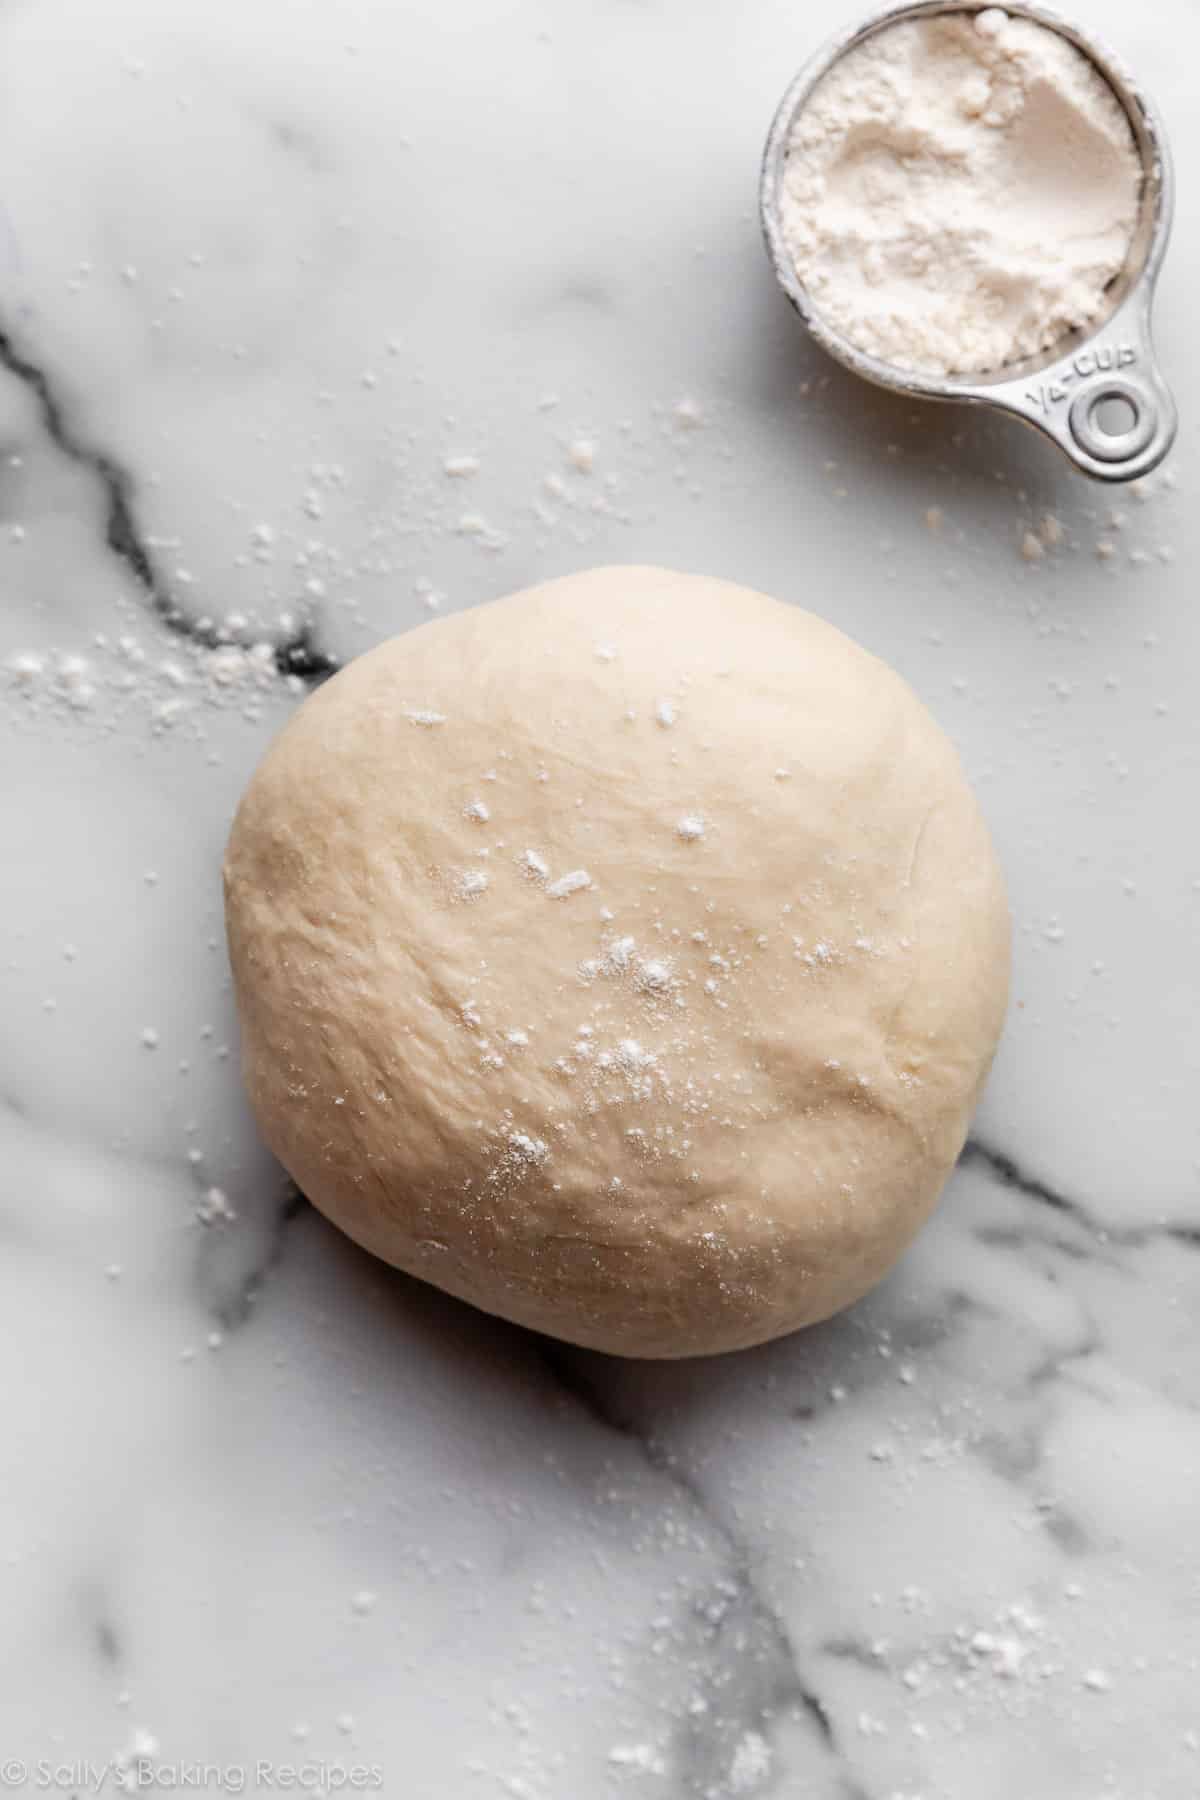
Right here is the dough after kneading:
Let the kneaded dough rise till doubled in dimension, like this:
Punch it all the way down to launch the air, and roll it out into an 8×20-inch rectangle:
Utilizing a pastry brush, brush the floor with a crushed egg white. Sprinkle cinnamon sugar on prime:
Roll it up right into a 9-inch log, place right into a loaf pan, and let it rise as soon as once more. Right here is the dough earlier than and after this 2nd rise:
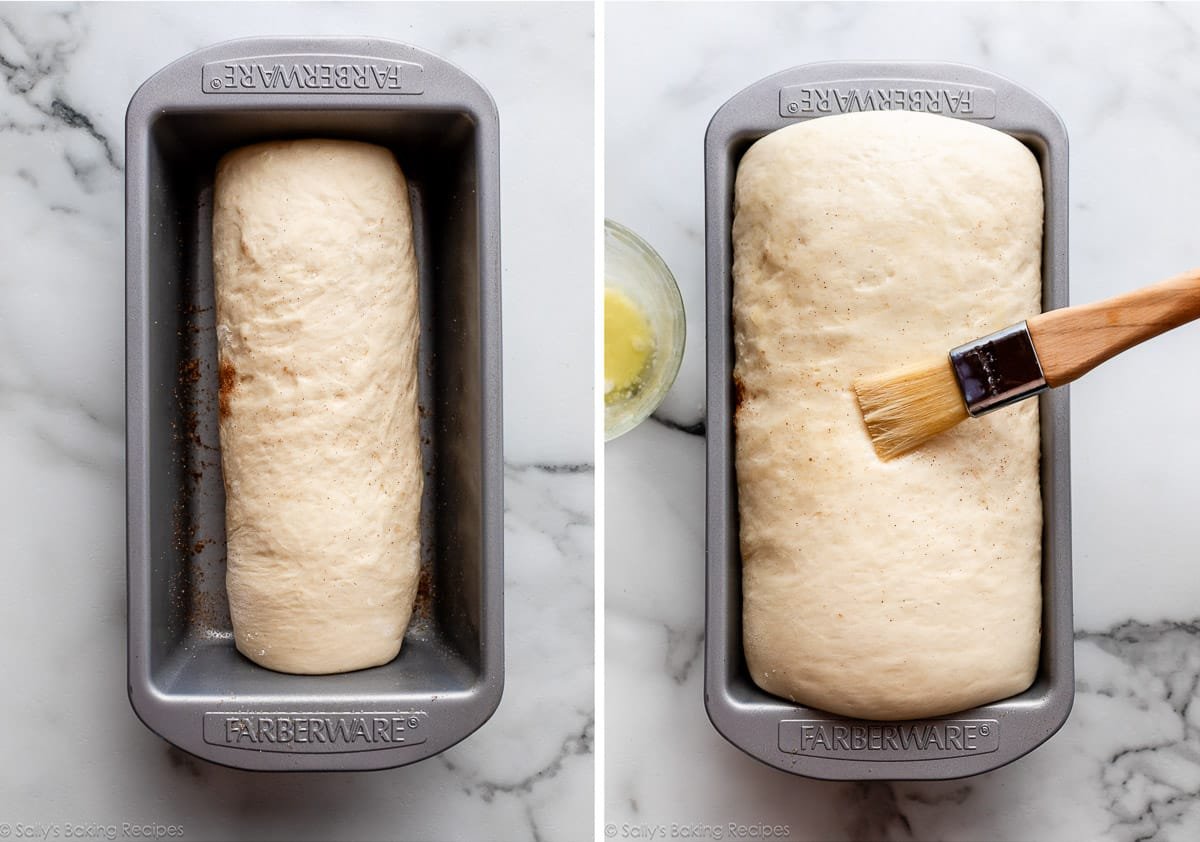
Earlier than baking, evenly brush the highest of the loaf with melted butter.
The bread takes about 40 minutes within the oven. Use an instant-read thermometer to examine the inner temperature of the baked bread. This ensures you received’t under-bake or over-bake the bread. The bread is completed when the middle is 195–200°F (90–93°C). An instant-read thermometer is an extremely useful bread-baking software; it’s also possible to use it on the very starting of the bread-making course of to examine the liquids are warmed to the best temperature to activate the yeast.
Gaps can kind between the dough and cinnamon swirl in your do-it-yourself cinnamon swirl bread. It’s occurred to me loads of occasions! It’s the moistened dough separating from the dry cinnamon-sugar combination because it bakes. To assist forestall this, be sure you are brushing the dough with egg white earlier than including the cinnamon sugar. Moreover, you should use a toothpick or skinny skewer to poke 3 holes within the prime of the risen loaf proper earlier than baking; it will assist steam escape.
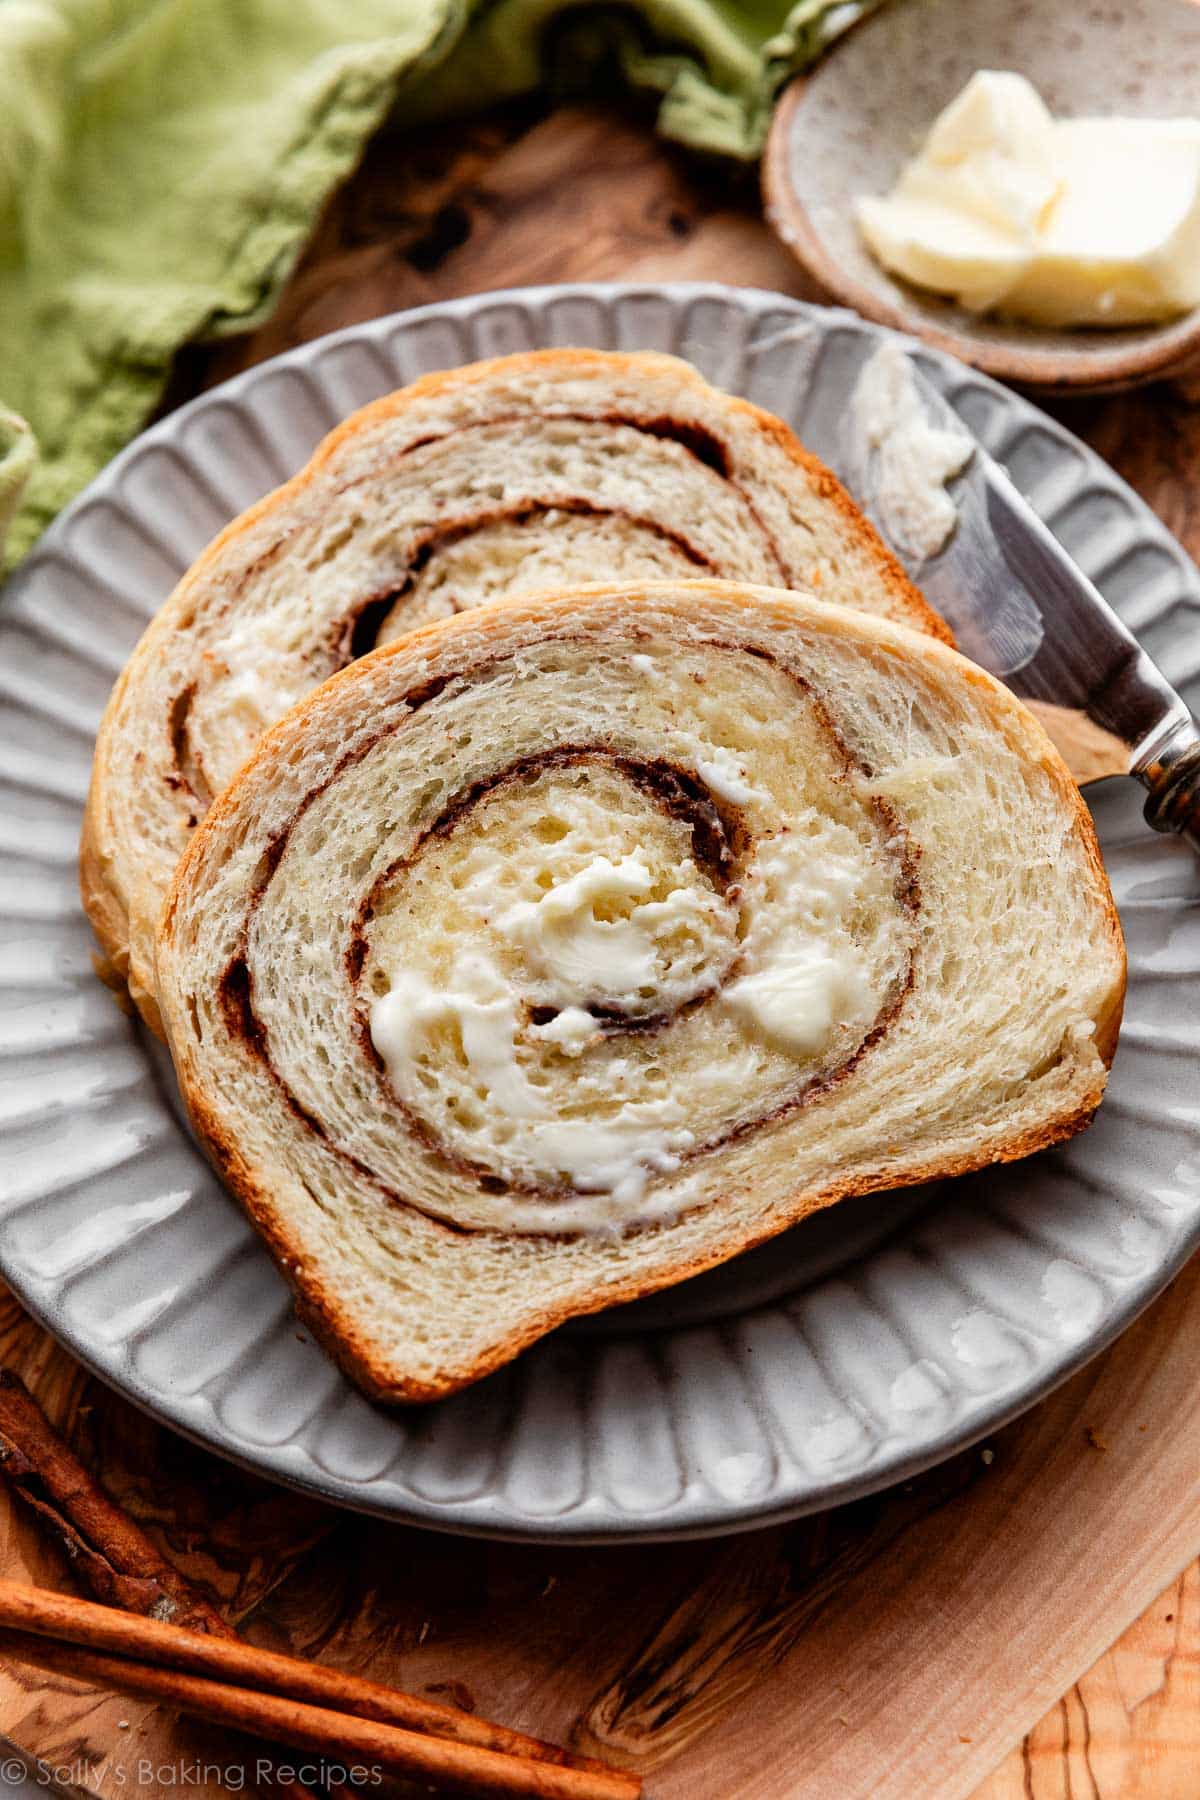
I nonetheless can’t determine which is greatest: the scent of do-it-yourself cinnamon swirl bread baking, the buttery and fluffy inside, or the hypnotizing, gooey, sticky, delectable cinnamon swirl.
By the way in which, you’ll undoubtedly wish to use this bread to degree up your French toast recreation, particularly in case you use it for apple cider French toast!
Develop into a Bread Baker with My Approachable Recipes:
Listed below are all of my bread recipes and video tutorials.
Home made Cinnamon Swirl Bread
Prep Time: 3 hours, half-hour
Prepare dinner Time: 40 minutes
Whole Time: 4 hours, 45 minutes
Yield: 1 loaf
Class: Bread
Methodology: Baking
Delicacies: American
Description
This do-it-yourself cinnamon swirl bread recipe is a household favourite and solely requires a handful of primary elements. It’s smooth and fluffy with essentially the most unbelievably gooey cinnamon swirl inside! See recipe Notes for freezing and in a single day directions. You too can reference my Baking with Yeast Information for solutions to frequent yeast FAQs.
Directions
- Put together the dough: Whisk the nice and cozy water, heat milk, yeast, and a couple of Tablespoons of sugar collectively within the bowl of your stand mixer fitted with a dough hook attachment. Loosely cowl and permit to take a seat for five–10 minutes till foamy and frothy on prime. *If you don’t personal a stand mixer, you are able to do this in a big mixing bowl and within the subsequent step, combine the dough along with a big wood spoon or silicone spatula. It can take a little bit of arm muscle. A hand mixer works, however the sticky dough repeatedly will get caught within the beaters. Mixing by hand with a wood spoon or silicone spatula is a more sensible choice.*
- Add the remaining sugar, the butter, 1 cup flour (about 130g), and the salt. Beat on low velocity for 30 seconds, scrape down the edges of the bowl with a silicone spatula, then add one other cup of flour. Beat on medium velocity till comparatively integrated (there should still be chunks of butter). Add the remaining flour and beat on medium velocity till the dough comes collectively and pulls away from the edges of the bowl, about 2 minutes. If the dough appears too moist to some extent the place kneading (subsequent step) could be inconceivable, beat in additional flour 1 Tablespoon at a time till you could have a workable dough. Dough ought to be smooth and somewhat cheesy, however nonetheless manageable to knead with evenly floured arms.
- Knead the dough: Preserve the dough within the mixer and beat for a further 8–10 full minutes, or knead by hand on a evenly floured floor for 8–10 full minutes. (When you’re new to bread-baking, my Find out how to Knead Dough video tutorial might help right here.) If the dough turns into too sticky throughout the kneading course of, sprinkle 1 teaspoon of flour at a time on the dough or on the work floor/within the bowl to make a smooth, barely cheesy dough. Don’t add extra flour than you want; you don’t want a dry dough. After kneading, the dough ought to nonetheless really feel somewhat smooth. Poke it together with your finger—if it slowly bounces again, your dough is able to rise. You too can do a “windowpane take a look at” to see in case your dough has been kneaded lengthy sufficient: tear off a small (roughly golfball-size) piece of dough and gently stretch it out till it’s skinny sufficient for mild to go by it. Maintain it as much as a window or mild. Does mild go by the stretched dough with out the dough tearing first? In that case, your dough has been kneaded lengthy sufficient and is able to rise. If not, maintain kneading.
- 1st Rise: Evenly grease a big bowl with oil or nonstick spray. Place the dough within the bowl, turning it to coat all sides within the oil. Cowl the bowl and permit the dough to rise in a comparatively heat surroundings for 1.5-2 hours or till double in dimension. (I at all times let it rise on the counter. Takes about 2 hours. For a tiny discount in rise time, see my reply to The place Ought to Dough Rise? in my Baking with Yeast Information.)
- Grease a 9×5-inch loaf pan. (I normally use this one or this one.)
- For the swirl: In a small bowl, whisk 1/4 cup (50g) sugar and the cinnamon collectively.
- Form the dough: When the dough is prepared, punch it all the way down to launch the air. Evenly flour a piece floor, your arms, and a rolling pin. Roll the dough out into a big 8×20 inch rectangle. It doesn’t need to be excellent—in reality, it would in all probability be rounded on the perimeters. That’s okay! Utilizing a pastry brush, brush the floor with crushed egg white, then sprinkle on the cinnamon-sugar, leaving a 1-inch border uncovered. Roll it up into an 8-inch log. Place the loaf, seam-side down, into the ready loaf pan. If any cinnamon-sugar filling spilled out of the edges, don’t waste it! Sprinkle it on prime of the bread within the loaf pan.
- 2nd Rise: Cowl the formed loaf and permit to rise for 1 hour, or till it’s about 1 inch above the highest of the loaf pan.
- Modify oven rack to a decrease place and preheat oven to 350°F (177°C). (It’s greatest to bake the bread in the direction of the underside of the oven so the highest doesn’t burn.)
- After the dough rises, soften the remaining 1 Tablespoon of butter. Utilizing a pastry brush once more, gently brush it on prime of the loaf. Be mild, in order to not deflate the dough. Bake for 35–45 minutes, or till golden brown. Test on the bread about midway by baking—if the highest of the loaf is browning too rapidly, tent with aluminum foil. To check for doneness, in case you gently faucet on the loaf, it ought to sound hole. For a extra correct take a look at, the bread is completed when an instant-read thermometer inserted into the middle of the loaf registers 195–200°F (90–93°C).
- Take away from the oven and permit bread to chill for a couple of minutes within the pan on a cooling rack. Take away loaf from the pan and funky it instantly on a cooling rack for a minimum of 10 minutes earlier than slicing. Be happy to let it cool utterly earlier than slicing, too.
- Cowl leftover bread tightly and retailer at room temperature for six days or within the fridge for as much as 10 days.
Notes
- In a single day Directions: Put together the dough by most of step 4, permitting the dough to rise in a single day within the fridge as an alternative of in a heat surroundings. The sluggish rise offers the bread great taste! Within the morning, let the dough sit on the counter till it involves room temperature, then proceed with step 5. I don’t advocate shaping the bread the evening earlier than as it would puff up an excessive amount of in a single day.
- Freezing Directions: Baked bread freezes splendidly! Wrap the loaf in plastic wrap, then a layer of aluminum foil. Freeze for as much as 3 months. Thaw in a single day within the fridge or at room temperature, then heat to your liking. You too can freeze the bread dough. After punching down the dough in step 7, wrap the dough tightly in plastic wrap, then a layer of aluminum foil. Freeze for as much as 3 months. Thaw in a single day within the fridge, then convey to room temperature. As soon as at room temperature, punch the dough down once more to launch any air bubbles. Proceed with the remainder of step 7 (shaping the dough).
- Particular Instruments (affiliate hyperlinks): Electrical Stand Mixer | Glass Mixing Bowl | Wood Spoon or Silicone Spatula | Rolling Pin | Pastry Brush | 9×5-Inch Loaf Pan | Prompt-Learn Thermometer | Cooling Rack
- Milk: Entire milk or 2% milk are greatest. I don’t counsel a lower-fat milk. Readers have used nondairy milks with success, however I haven’t personally examined it.
- Yeast: I at all times use Crimson Star Platinum yeast, an on the spot yeast. You need to use lively dry yeast as an alternative, with no adjustments to the preparation. Rise occasions will probably be barely longer. Reference my Baking With Yeast Information for solutions to frequent yeast FAQs.
- Flour: Larger-protein flour like bread flour is greatest for this bread recipe due to its sturdy gluten formation and excessive rise. All-purpose flour could yield a flimsy bread.
- Entire Wheat Flour: I don’t advocate entire wheat flour as a result of it doesn’t have the identical baking properties as white flour or bread flour (the gluten ranges are totally different). When you want to use entire wheat flour, attempt my recipe for entire wheat bread as an alternative, and be at liberty so as to add the egg white/cinnamon swirl to that dough as an alternative.
- Can I Add Raisins? Sure, you’ll be able to add 3/4 cup (about 110g) of raisins to the cinnamon-sugar combination. Sprinkle it over the egg white-brushed dough.
- Bread Machine Questions: I don’t personal a bread machine so I’ve not examined it, however some readers have reported success within the feedback part.
- Forestall Giant Gaps: Gaps can kind between the dough and cinnamon swirl in your do-it-yourself cinnamon swirl bread. It’s occurred to me loads of occasions! It’s the moistened dough separating from the dry cinnamon-sugar combination because it bakes. To assist forestall this, be sure you are brushing the dough with egg white earlier than including the cinnamon-sugar. Moreover, you should use a toothpick or skinny skewer to poke 3 holes within the prime of the risen loaf proper earlier than baking; it will assist steam escape.
Key phrases: Home made Cinnamon Swirl Bread